The next step in the setup process is the creation of a survey. A “survey” is the review site that your customer will be using to leave their review and claim their giveaway. Let’s go over how to create a survey.

- First, click the “Surveys” item in the left navigation
- Then, click the “+ Add Survey” button
Note: This is a dummy Amazon order number that you can use to test your survey.
Survey Settings
To configure the survey, we begin on the Survey Settings tab.
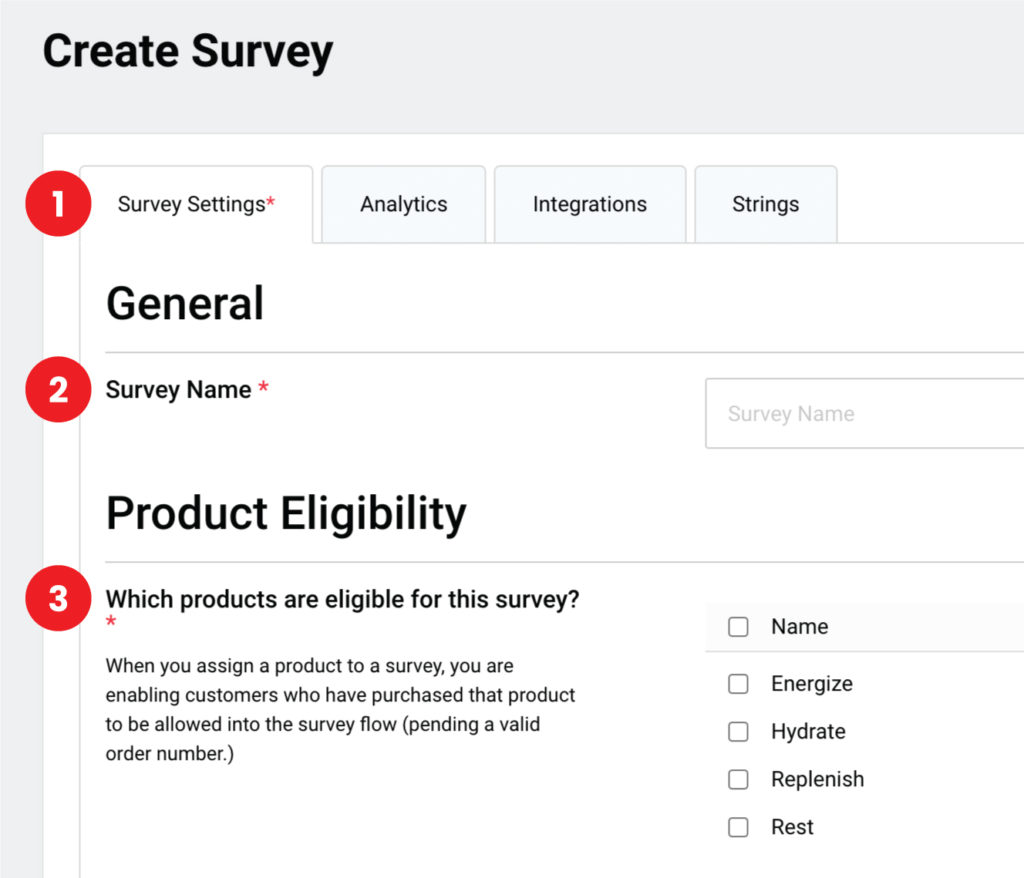
- Tabs: Note that there are 4 tabs that we can use to configure our survey.
- Survey Name: The Survey Name is how you will identify your survey internally. The Survey Name will also act as the “Title” of your survey that customers will be able to see in their browser tabs.
- Product Eligibility: Marking a product as eligible makes anyone who has purchased this product eligible to claim this product’s giveaway(s).

- Logo Image: The logo image is what is displayed in the header of the web page. It is recommended that you use a logo with the aspect ratio of 2.5:1, or 250 pixels wide by 100 pixels high.
- Background Image: The background image is what is shown in the background of your survey. To scale to common browser resolutions, it is recommended that you use a background image with the aspect ratio of 2:1, or roughly 2,000 pixels wide by 1,000 pixels high.

- Star Rating Limit: Star rating limit allows you to set the minimum star rating you would like to allow to leave a review. For example, if you set the star rating limit to 4 stars, then only reviews with a 4 or 5 star rating will be prompted to copy and paste their review.
- Maximum Discount: Maximum discount allows you to disqualify orders who have bought a product over the percentage off that you define in this field. For example, if you sell an item at 21% off, but your maximum discount limit set here is 20%, then the customer who purchased at 21% off will not be eligible to claim a giveaway.
- Require Ratings/Reviews on GetReviews: Requiring ratings/reviews on GetReviews requires your customer provide a rating and/or review on the product they purchased from you on GetReviews before they can claim their free product. Requiring your customer to paste their review to Amazon will be discussed on step 9 below. You have 3 options when it comes to requiring ratings and reviews on GetReviews.
- Require Rating and Review: Requiring a rating and review makes it so your customer cannot claim their giveaway without first providing a rating and review.
- Require Rating : Requiring ratings makes only the rating portion of the rating and review mechanism required. This means that your customer is required to provide a rating, but leaving a review is optional.
- Do Not Require Either : Do not require either means that leaving a rating and review will be optional fields on the survey, and your customer will be able to bypass this step without providing a rating or review.
- Prompt to Leave Review on Amazon?: This option determines when and if to prompt your customer to leave their review on Amazon. There are 4 options.
- Require user to visit Amazon before giveaway selection: This option requires your customer click the “Copy Review” and “Paste Review to Amazon” buttons in succession before being allowed to claim their giveaway. The “Copy Review” button copies the customer’s review to their clipboard, and the “Paste Review on Amazon” button opens Amazon to the leave a review page for the product that the customer purchased from you.
- Prompt user to visit Amazon before giveaway selection, but do not require: This option is the same as the previous, however your customer is not required to copy or paste their review to Amazon.
- Show optional prompt at the end of the survey: This option moves the copy/paste to Amazon prompt to the very end of the survey. Moving the copy/paste to Amazon prompt to the end of the survey enables your customer to claim their giveaway before being asked or required to copy/paste their review to Amazon.
- Do not prompt at all: This option removes the copy/paste to Amazon prompt entirely.
- Time Delay: Time delay allows you to set an amount of time (in days) that your customer must wait before they are allowed to claim their giveaway. Time delay is calculated off of Amazon purchase date. If your customer attempts to claim their giveaway before the time limit has been reached, they are alerted to come back in the number of days left before the time limit has been reached.
- Collect Cell Phone Number: This option gives you the ability to collect your customer’s cell phone number as part of the giveaway redemption process. If selected, there is also an optional “make required” checkbox that allows you to require the customer to input their cell phone number in order to claim their giveaway.
- Lifetime Giveaway Redemption Limit: This option allows you to limit the number of giveaways that one customer can make on this survey in their lifetime. For example, if one customer orders two products that are both eligible to receive a giveaway, but you have set your lifetime giveaway redemption limit to 1, then that customer will only be able to claim 1 giveaway on this survey.
- Fine Print: Fine print gives you a space to include any terms and conditions that apply to you survey.
Analytics
The analytics tab enables the insertion of tracking pixels onto your survey for ad audience building and analytical purposes. There are 4 potential insertion areas.

- Code Slot 1: Injects contents of text box immediately after the opening <head> tag.
- Code Slot 2: Injects contents of text box immediately before the closing </head> tag.
- Code Slot 3: Injects contents of text box immediately after the opening <body> tag
- Code Slot 4: Injects content of text box immediately before the closing </body> tag.
Integrations
Integrations allow you to route your survey completion data to external systems. Note: if you would like to enable global integrations, click the user icon in the top right corner, and then click “Integrations.” Here you can enable integrations that will enable new options on this integrations tab. Read more about global integrations here.

- Webhook URL: GetReviews surveys are Webhook-enabled, meaning that the entire review object is able to be sent to a destination of your choosing. Utilize Webhooks by following the integration instructions here
Strings
Strings allow you to change the text of your survey. You can find the latest strings document here. If you plan on changing a certain segment of the strings document, you can ensure your JSON object is valid and will upload using this tool.

- Survey Strings: Insert your strings code into this text box and click save.
Embed Code
If you would like to embed your survey, you can do so using the embed code provided on the survey edit page. The “Embed” tab appears after you have saved your survey, since a survey URL needs to be generated in order to generate the embed code.

Questions? Leave us a comment in the box below or email us at support@getreviewsai.zendesk.com